Monday, December 24, 2007

How to make your very own home movie for Christmas

Nowadays sharing your digital photos with family and friends is such an easy thing to do. But the next time you're thinking about sharing your latest batch of photos, don't just e-mail them or put them all on a disk and send them off in the mail. Take a little bit of extra time and create a photo movie with background music and DVD menu templates using Wondershare DVD Slideshow Builder.

With DVD Slideshow Builder, you also have the option of using video clips in your photo movie. Your photo movie can contain a combination of still photos, video clips, and audio—it's up to you. Viewing your photos with stunning transitions and background music will definitely make an impression the next time you decide to share your photos.
You can still share your finished movie by e-mail or by burning it to a DVD/HD DVD/VCD disc, but watching it will be a much better experience for your audience. Making a photo movie is fun and easy and doesn't take much time.

Here's what you'll need:

•Wondershare DVD Slideshow Builder Version 4.0 or later
•Digital photos/videos located in your hard disk
•Digital music located in your hard disk

In the following how-to, I'll create a basic home movie using DVD Slideshow Bulder. There are so many features in the software that you could spend hours on one slideshow, but getting started is pretty simple. Where you go from there is up to you.

Step 1: Import images, videos, and audios

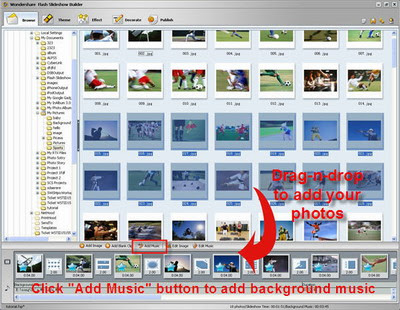
After I edit the images I want to use, I find the folder I saved them in. In this case, I'll just add the whole folder. Click on the first button on the Tool Bar located above the Story Board and select “Add Photo/Video”, press CTRL+A to select all the files in the pop-up window, and then click “Open” to import. This works the same way for videos, but for audio, what’s the only different is that click the second button on the Tool Bar. The files you added will be displayed on the Story Board at the bottom.


Import images, videos, and audios


Step 2: Choose transition & motion Effects

DVD Slideshow Builder has close to 200 different transition and motion effects to pick from, which includes 2D & 3D effects. Click on a transition thumbnail between two slides and you can look at all of them by dragging the slide bar. If you click on any of them, you can see a preview in the bottom left. To choose one, double click on it. Also, click on a transparent pentacle on the bottom left of a slide and you can select one effect for each slide. The pentacle will become blue if an effect was added on the slide.


Choose transition & motion Effects


Step 3: Timing

All the images I added show up in the Story Board now. This step makes a huge difference in the feel of the show. You can change the slide times and transition times to make the show go as fast or slow as you want. Set different timing accords to different effects to make the slideshow look the best. Just double click on the timing underneath the slide thumbnail and transition thumbnail and then set to one as you want.


Timing


Step 4: Time Line

With DVD Slideshow Builder Version 4, a brand-new feature TimeLine was added. This feature helps users much easier to adjust the starting and ending position of the audios and captions.


Time Line


Step 5: Edit Slides

This is where things really get interesting. Double-click on any slide to open Edit Photo/Video. Here, you can crop the slide, add effects for slide, make image adjustments, and so on. It’s so easy, and you will learn how to do by using.


Edit Slides


Step 6: Add Intro/End Credits

Now it’s time to add intro/end credits to make it just like a real movie. The credits you created will appear in the beginning and ending position of the Story Board. Right click on the first slide and select “Insert Blank Slide”, and then click the third button “Add Text” to add captions for the credit movies. This works the same way to add End Credits but “Add blank slide” at the end of the slideshow.


Add Intro/End Credits


Step 7: Customize your DVD menu

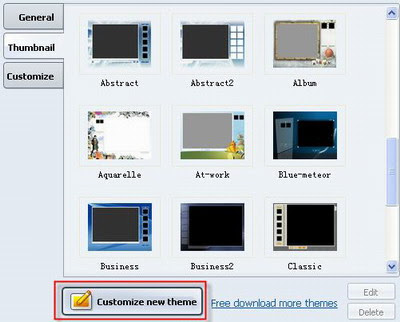
More than 160 professional designed DVD menu templates are available to use for any occasions. Choose your favorite templates to make your slideshow look good at the first sight. Drag the positions of the frame, text, play button to anywhere as you want. Customizing the DVD menu is also a fun. Just click the button “Custom…” at the bottom left and then change the background images to your very own, and set the “Layout” & “Frame Style” to make your DVD menu unique.


Customize your DVD menu


Step 8: Preview slideshow

At any point, you can preview your show to see how it's coming along. In the “Slideshow” Tab, click the black Play button and the preview will start. But if you want to preview more than one slideshows with DVD menu, please switch to “Preview” Tab and click on the number to preview the corresponding slideshow.


Preview slideshow


Step 9: Output

When I am through making a slideshow, there are generally two ways that I distribute the show: burning as a DVD/HD-DVD/VCD discs and converting as a MPEG-I/MPEG-II/MPEG-IV/AVI/WMV/3GP video. DVD Slideshow Builder has built-in DVD authoring with all kinds of options, from quality settings and encoding options. This saves a lot of time because I don't have to use any other software to create menus or burn DVDs. My family and friends love watching my slideshows on their TV and I love sharing that experience with them. Using video output, I can convert slideshows to videos directly for use on mobile devices like iPod®, iPhone®, Zune™, PSP®, cell phone and more.


Output

Tuesday, December 11, 2007

Celebrate with Wondershare Holiday Deals

T'is the season for sharing the joy of Wondershare Photo Creative Software with family & friends.

There are three xmas benefits for this holiday:

40% Off - Three value-loaded products for one special price. The Photo Creative Suite including Photo Collage Studio, Flash Slideshow Builder and DVD Slideshow Builder originally sold at $129.95, now only $79.95 you can get one to create fabulous collages or scrapbooks, make eye-catching flash albums and DIY a photo movie showing on TV with your digital photos.

Free Xmas Templates - Get a bunch of cool new free Xmas templates as holiday bonus, worthy of $39.

Buy 1 Get 1 Free - Buy any photo software pack, get one iPod Movie Maker for free. To celebrate this Xmas and give more extra benefits, we will send an iPod Slideshow to the purchased customers as a special gift, which regular price is $29.95

Click here for more details & to order.

Monday, November 26, 2007

Meaningful Xmas gifts match to special person

Christmas gifts signify the happiness and celebration, of course important in our Xmas plan. But finding the perfect Christmas gifts for the special persons in our lives is really difficult, racking our brains in scheming. Now if you have a digital camera and a computer, you can stay far away from trouble and make personalized, unique Xmas gifts that will help your loved persons remember their happy moments.

Capture the highlight with your digital camera
To give your special person surprise, you have to take some out-of-the-ordinary pictures as raw materials to create your gift. It means you should use unique perspective and subjects to shoot the pictures that nobody else will take. Following the tips below, you will have all photos you need to get started:
  • If you have opportunity to go Xmas shopping with your special person, do not forget take your digital camera and record the happy shopping. The Christmas decorations carefully chosen scene and bargain time both are the best subjects, not to let them quietly slip.
  • Christmas decorating through the whole house is a perfect time for everyone. Take pictures while your loved persons prepare. Also make sure the labor results- this year’s Xmas house is in your digital camera.
  • Christmas dinner is the precious moment of the family reunion. Snap the candid moments and those filled with the emotion of dinner.
  • In Christmas carnival party, pay attention to each person’s facial expression and action especially your special person’s, then keep his/her every delighted presentation eternal on the digital photos. Notice not to miss any little thing that other person will ignore such as the party decoration and food.

DIY creative gifts to your special person
Once you have got the requested pictures, it's time to decide what form your gift will take. Here are a few unique Christmas gift ideas that will help you create the most unique gift to delight the person who receive them.

  • Make Xmas Collages. Using a photo collage or digital scrapbooking software, such as Picasa, Photo Collage Studio, to combine multiple photos into a single image that you can frame the highlight in Christmas forever. What’s more, you can take advantage of the free Xmas templates to realize it easier. Just choose a colorfully designed Xmas template, drop in your photos, customize your text, add embellishments, photo frames, and click. Beautifully printed pieces will be delivered to you in minutes. Put them into your loved person’s mail box, he must be surprised and happy.
  • Create a Xmas Calendar. Select your favorite digital photos, put them into a predesigned Xmas calendar template, add your greetings and print out. Besides the professional calendar tools, Photo Collage Studio also can help you complete it. When you go to your special person’s house, watch the calendar you created on desk or hanging on the wall, your heart will be filled with sweet.
  • Design a Xmas Photo book. Combine Xmas collages that you create with a suit of Xmas templates into a photo book to tell your loved person’s whole Xmas story. This special book will undoubtedly find a place of honor on recipients’ coffee table.
  • Burn Xmas photo movie to DVD. Making use of some DVD slideshow software like DVD Slideshow Builder, you can design Xmas slideshow movies for your loved person with transitions, 3D effects, unique decorations and dynamic camera movements and zooms. Burn and present your designed cinematic TV slideshows ready for a big audience - without any experience!
  • Share Xmas photo album on the Internet. Create a digital photo album for your special person and then upload it on your web, MySpace, Blogger, etc. While your loved person visits, you can imagine how delighted he/she feels. Try Flash Slideshow Builder such easy flash tool, even if a flash green hand can also realize it breezily.
  • Show your designed entertaining slideshow movie on iPod. iPod, portable media player becomes wildly popular among the fashion crowd. If your special person also has one, using a iPod slideshow software to make or convert Xmas photo movie for his iPod. The new method enables him share your unique gift filled with memories at any moment and anywhere.

With Christmas coming, many company offers unbelievable discount to celebrate the important holiday. Don’t miss the special Xmas offer to create your personalized gifts for your loved person.

Monday, November 12, 2007

DIY your personalized Wedding Invitation Card

Have you ever thought of designing your wedding invitation card by yourself? Maybe you'll consider it as a hard work if you are an amateur.Here I'll recommend an easy scrapbooking tool to make it! Which you need prepare first is only your digital photo.


To realize it with Photo Collage Studio do the following:
Step 1. Create a new collage from template(the software supplies four ways to start the design including from template, from layout, from blank and from image) and select your favorite theme template; here we choose the template named as Love 3 to match the occasion of wedding.


Step 2. Adjust the objects in the template according your needs. Everything except the background picture of the pre-designed template can be moved, enlarged, minished and deleted separately so that you can also do many things with the template. Here in order to make the invitation card look much better, we just hold the wedding frame and roses.

Step3. Double click or drag your photo from the left list box to the frame of template and adjust the size of photo in the frame to the best effect by using the editing toolbar upper of the selected photo; The first button is used to move the photo in the frame; are used to enlarge or reduce the size of photo in the frame. If you only want to import a part of the photo, the fifth button for cropping can help you realize it easily.


Tips: If you think your photo is too dark or not perfect, use the effect tab to retouch it without hesitation. There are many effects offered by the program, such as old picture, oil, blur, brightness, contrast, embossment and more. Double-click a thumbnail of effects to apply the effect to your photo and right click to cancel.

Step 4. Add the important captions such as the card theme, wedding address, wedding time and your name. The powerful function of text editing like wordarts, shadow, halation, texture can give you more space to show your creativity. Here we should be cautious to decorate the words for standing out the romantic theme.


Step 5. Print your personalized wedding invitation card at home with more custom sizes or even more than one picture on a page. Sent the prints to your families and friends, they must be surprised.


You can do many other things to design your invitation card such as adding effects, cliparts, stamps, frames or masks. But I think it's not suitable to using here. Photo collage studio is a collage and digital scrapbook application but if you have more inspiration you can do many things with it. Let your mind fly now!

Monday, November 05, 2007

Just a few minutes to create a beauty digital scrapbook

The step-by-step instructions will let you know clearly how to use the photos below to create a digital scrapbook with Wondershare Photo Collage Studio.

Original four photos:


Digital scrapbook made with Photo Collage Studio:


To realize it with Photo Collage Studio you only do the following:

Step 1. Create a new collage from template(the software supplies four ways to start the design including from template, from layout, from blank and from image) and select your favorite pre-designed template; here we choose the template named as General 20.

Step 2. Double click or drag photo from the left list box to the frame of template.


Step 3. Move and adjust the size of photo in the frame to the best effect by using the editing toolbar upper of the selected photo; The first button is used to move the photo in the frame; are used to enlarge or reduce the size of photo in the frame. If you only want to import a part of the photo, the fifth button for cropping can help you realize it easily.

Step 4. Retouch the photo with the effect tab to make it look perfect; there are many effects offered by the program, such as old picture, oil, blur and more; here we choose Brightness Contrast to apply in order to let the photo match the background.


Notice: double-click a thumbnail to apply the effect to your photo and right click to cancel.
Drag the other two photos into the relevant position and do some adjustments to make them look better.


Step 5. From the upper figure you can notice that the orientation of frame on the right bottom is landscape but we need import a photo of portrait orientation. What we should do? Don’t worry! The frame and other objects in the template all can be moved and adjusted freely by dragging the mouse.
>

Step 6. Publish or print; after importing the last photo, you can use publish tab to preview the collage and save it as jpeg format, wallpaper, or email it directly to the person you want to share with. Also you can show off your masterpiece with the high-quality print function.


You can do many other things to decorate your scrapbook such as adding wordarts, cliparts, stamps, frames or masks. More details you can get from the program tutorial. But you can image that using any other more embellishments in this digital scrapbook really gild the lily.

Download and have fun Now

Learn More

Wednesday, October 31, 2007

Happy Halloween

Greetings,
I wish every our friends have a good time on Halloween. I appreciate your contributions and supports at this blogger. I hope you will have a special Halloween. Please feel free to share your joy here.

Sincerely,
Your friend at
Flash Photo Slideshow

Saturday, October 20, 2007

How to Create the Lightning Effect for Photo Slideshow

When you tell a mysterious story in your slideshow, What about adding a sudden lightning with thunder? This tutorial guides you through creating the lightning effect in a breeze.

Step1 Start DVD Slideshow Builder and add a photo onto storyboard.

Step2 Right click the storyboard and insert the same photo 4 times.

Step3 Click the thumbnail of transition effect to add “Smooth Rect In” effect to each photo.


Step4 Double click the second photo thumbnail to edit photo. Click Picture effect button, select flash effect, set Radius to maximum and adjust the center with CenterX and CenterY. Do it same to the third photo.

Step5 Double click the time under the thumbnail, set 0.1 second to all the photos and transition effects, except the last photo sets 2 seconds.

Step6 Add a sound of thunder about 3 seconds as background music. You can double click the music to trim it. You’re done. The result looks like this:

This my creation:

Happy Halloween!

Take a treat to fill your basket!

Wow, imagine Halloween with all its ghosts and goblins, parties, fun traditions and the smell of fall in the air. Why not open your mind? Make a terrific movie and tell your mysterious story on TV with DVD Slideshow Builder. Moreover, create a funny flash slideshow and broadcast your joy on web with Flash Slideshow Builder. Go ahead! Design a magic collage and release your inspiration with Photo Collage Studio. Here is a treat for you!

Want to get more information? Please click the image below to visit our website.

Happy Halloween!

Since fall is my favorite season, it's seems fitting that it's also the time of my favorite holiday. Halloween is pure fun and that is why I love it.

Halloween provides lots of creative opportunity for decorations and costumes. Halloween is a great time for food because you can try just about any recipe and if it doesn't look perfect, it doesn't really matter. Ugly, creepy things are cute at Halloween.

How are you celebrating Halloween? Have some parties? Watch horrow movies? Or out for dinner? Whatever you plan, be sure to make a flash photo album with the photo you taken and share with your family and friends.

However you celebrate and whatever you create, Happy Haunting!

Please click the image below to see the flash I create for Halloween with Flash Slideshow Builder. How do you think of it? Please advise.


Monday, September 17, 2007

How to Share Your Slideshow in Different Ways

Nowadays,we live in a digital world.It is convenient to share our life's events with others via multimedia. How many ways do you know to share your slideshow? Where are your sources from?I am here share my experiences,I hope it will help those person who are interested in making slideshow.

How to share your slideshow in Youtube:
Step1.Run the program and then add and organize the photos in the "Organize Photos" window. Step2.Add your favorite music as the background music and then apply an album theme to decorate your album.
Step3.Choose "YouTube Uploadable Movie" as the output in "Burn Disc" window and then click "Create Now" to export your slideshow in .flv format, which is supported by YouTube. Step4.After the encoding, a folder named "youtube" is created automatically in your fixed path. The default path is on your desktop. Each album in your slidehshow will be encoded as an individual FLV file.
Step5.FiveLog in your YouTube account and then click "My Videos" and then choose to upload videos. Then in the first step of uploading, choose your output slideshow and then upload it.

How to share your slideshow on Myspace:
Step1.Upload your pics to myspace
Step2.Look under the upload button and it asks to upload a slideshow.
Step3.Pick your style....it gives you a code
Step4.Get the code Highlight it hit ctl+c (copy),then go to a section in your editing about or something and hit ctrl+v (paste)

How to share your slideshow on yahoo!360°:
Step1: Open your Yahoo! 360° blog editor.
Step2: Check the "View HTML Source" option,
Step3: Paste the clipboard to the editor, keep the section from "embed" and delete the others.

How to share your slideshow on TV:
Step1: Add pictures and videos,and synch with background music.
Step2: Edit picture by crop,add effects,text etc. and trim video and add music and narration.
Step3: Add transition and pan&zoom effects.
Step4: Add disk menu and preview
Step5: Burn slideshow to VCD or DVD which can be played on TV.

To save your time,I get a similar tutorial in this website.http://www.wikihow.com/Create-DVD-Christmas-Slideshow-with-WondershareTip: You can also share your slideshow on mobile phone, such as iPod,iPhone,Zune,3G phone like that.Only the output format is different.I always use Movie Maker2.1 or Photo Story 3 to make a slideshow,because they are both free. More other slideshow softwares, you can google it by yourself or have a review here:http://photo-slideshow-software-review.toptenreviews.com/

Some one also ask how to convert home video to computer,so I quote these words of one friend on line: The specific answer will depend upon the format your home movies are in. If they are "film" home videos, then you will need to project them and re-record them onto video. If they are VHS or some format like 8mm or Hi-8, you'll need to play the tape back through a capture card or USB capture device which will digitize the signal and put it onto your hard drive. If they are miniDV videos, Digital 8, or newer formats, then your camcorder should have a firewire output, sometimes called iLink (by Sony). You will need a firewire card or input on your computer, and you simply plug the camcorder into the computer via a firewire cable. At that point, it will then depend upon the software on the computer. Both Windows XP/Vista and Mac have built in programs to import video from firewire, and from there, you can do some simple editing and then output it back to a DVD, if you have a DVD burner.

Source:
How to share your slideshow in Youtube is quoted from: http://www.ehow.com/how_2002719_share-photo-slideshow-youtube.html
Youtube website:
http://www.youtube.com/
Myspace Website:
http://www.myspace.com/
Yahoo!360°Website:
http://360.yahoo.com/login.html?.done=http://360.yahoo.com/
Other SlideshowWebsite:
http://www.slide.com/main
http://www.picturetrail.com/
http://www.slideroll.com/
http://www.bubbleshare.com/
http://www65.rockyou.com/
http://www.filmloop.com/http://www.slideshare.net/
http://www.smilebox.com/http://www.photobucket.com/
http://www.onetruemedia.com/http://www.myflashfetish.com/myspace-slihttp://www.myflashfetish.com/myspace-sli...
http://www.nesoft.org/photo_slideshow_ma...
Good download website:
http://www.download.com/http://www.tucows.com/
One good free download website:
http://www.giveawayoftheday.com/

Thursday, September 06, 2007

Famous Films And Famous Lines

I love collecting famous films, and some famous lines in the films always touch my heart. I cut my favorite video segments of these famous films and quote the famous actor's lines. And then I make them to video slideshow, which I can share with my friends on TV, PC and the Web. When I graduated, I make a DVD slideshow and send it as a gift to some of my classmates who I can see them no more. I think good films give us a bright hope rather than give us a amusement. Let us remember these famous lines and thank goodness every day.


Forrest Gump
1. Life was like a box of chocolates, you never know what you’re gonna get.
2. Stupid is as stupid does.
3. Miracles happen every day.
4. Jenny and I was like peas and carrots.
5. Have you given any thought to your future?
6. You just stay away from me please.
7. If you are ever in trouble, don’t try to be brave, just run, just run away.
8. It made me look like a duck in water.
9. Death is just a part of life, something we’re all destined to do.
10. I was messed up for a long time.
11. I don’t know if we each have a destiny, or if we’re all just floating around accidental?like on a breeze.


The Lion King
1. Everything you see exists together in a delicate balance.
2. I laugh in the face of danger.
3. I’m only brave when I have to be. Being brave doesn’t mean you go looking for trouble.
4. When the world turns its back on you, you turn your back on the world.
5. It’s like you are back from the dead.
6. You can’t change the past.
7. Yes, the past can hurt. But I think you can either run from it or learn from it.
8. This is my kingdom. If I don’t fight for it, who will?
9. Why should I believe you? Everything you ever told me was a lie.
10. I’ll make it up to you, I promise.

Gone with The Wind
1. Land is the only thing in the world worth working for, worth fighting for, worth dying for. Because it’s the only thing that lasts.
2. I wish I could be more like you.
3. Whatever comes, I’ll love you, just as I do now. Until I die.
4. I think it’s hard winning a war with words.
5. Sir, you’re no gentleman. And you miss are no lady.
6. I never give anything without expecting something in return. I always get paid.
7. In spite of you and me and the whole silly world going to pieces around us, I love you.
8.I love you more than I’ve ever loved any woman. And I’ve waited longer for you than I’ve waited for any woman.
9. If I have to lie, steal, cheat or kill, as God as my witness, I’ll never be hungry again!
10. Now I find myself in a world which for me is worse than death. A world in which there is no place for me.
11. You’re throwing away happiness with both hands. And reaching out for something that will never make you happy.
12. Home. I’ll go home. And I’ll think of some way to get him back. After all, tomorrow is another day.


TITANIC
1. Outwardly, I was everything a well-brought up girl should be. Inside, I was screaming.   
2.We’re the luckiest sons-of-*es in the world.
3. There is nothing I couldn’t give you, there is nothing I would deny you, if you would not deny me. Open you’re heart to me.
4. What the purpose of university is to find a suitable husband.
5. Remember, they love money, so just pretend like you own a goldmine and you’re in the club.
6.All life is a game of luck.
7. I love waking up in the morning and not knowing what’s going to happen, or who I’m going to meet, where I’m going to wind up.
8. I figure life is a gift and I don’t intend on wasting it. You never know what hand you’re going to get dealt next. You learn to take life as it comes at you.
9. To make each day count.
10.We’re women. Our choices are never easy.
11. You jump, I jump. (another touching sentence)
12.Will you give us a chance to live?
13. God shall wipe away all the tears from their eyes, and there shall be no more death. Neither shall there be sorrow or dying, neither shall there be any more pain, for the former world has passed away.
14. You’re going to get out of here. You’re going to go on and you’re going to make lots of babies and you’re going to watch them grow and you’re going to die an old, an old lady, warm in your bed. Not here. Not this night. Not like this.

Tuesday, September 04, 2007

How to create a thumbnail flash slideshow on your website

Recently I have had several friends ask me how to create a flash slideshow with thumbnails, and then upload it onto their websites. Many people think that creating a thumbnail flash slideshow is a very difficult thing for those who don’t know flash and HTML skills, this is not the case.

Actually they can meet their demands by using flash slideshow Maker. There’re lots of such softwares on the Internet. You may pick one from Google. I always use a software launched by Wondershare. To be honest, it’s easy-to-use and the flash generated is awesome.

Just drag-n-drop the photos and some mouse clicks, a stunning flash slideshow will be completed in minutes.

Here are the steps to follow:
Step 1: Download and install the photo gallery softare, then run it.
 

Step 2: “Browse” , add the photos and music for your own collection. You can simply drag-n-drop the photos to the Story Board or click the “Add Image” button above Story Board to add photos. Adding music is also easy. Just click lick the “Add Music” button besides “Add Image” button.
Flash Slideshow Builder

Step 3: “Theme”, select a themed template as you like or customize one by yourself with inspiration in “Theme” Mode. Nearly 100 various styles of ready-to-use templates are available for you to use. Just pick one or customize a new theme of your own.
Flash Slideshow Builder

Step 4: “Publish”, there are various publish options for you. Here we publish as flash files for example. Click “create SWF Movie” to publish.
Flash Slideshow Builder

Step 5: Since now, the flash is completed. What’s left is just upload it to your website and copy the code in your webpage. First, you need to upload the SWF file(s) to your own webhost or an external webhost. After uploaded the SWF file(s) to a webhost successfully, simply add the following code to your webpage. Do remember to replace the .swf file path "http://www.flash-slide-show.com/demo.swf" in the following code with your own path and filename. You also need to change the code width="800" height="600" if your flash size is not 800*600.


OK. All is done. Now you can share your thumbnail flash slideshow with your families and friends anytime you want. My friends are doing well with Flash Slideshow Builder, so how about you? I hope this helps you understand how to create a thumbnail flash slideshow on your website using Flash Slideshow Builder.


Related Tutorials:
XML Slideshow
Free Flash Banner Tutorial
Html Photo Gallery
Flash Image Scroller
Flash Slideshow Tutorial
Flash 3D Carousel
Flash Image Gallery
Flash Image Rotator

Thursday, August 30, 2007

New Arrival: Wondershare Flash Slideshow Builder 4.0

Brand-new Wondershare Flash Slideshow Builder 4.0 is released! We have optimized a bunch of enhancements of this new version. First you will get a surprise of the new look. It’s more clear and easier to use. One of the most enhanced feature is the Theme Designer, which can allow you to design various styles of theme templates with inspiration, like general, thumbnail and numeric. What’s more attractive is that you can set the number of rows and columns of the thumbnails as you like.

Also added are other enhancements like password protection, more themed templates & transition effects(we got the suggestions from users who submitted the Online Survey), customize motion effect (lots of users are keen on this).

Want to experience the brand-new Flash Slideshow Builder 4.0? Try it FREE from
http://download.flash-slide-show.com/fssb_trial.exe.
More details are available at our new website http://www.flash-slide-show.com.

Tuesday, August 28, 2007

2008 Get Together in Beijing Olympic

China is one of the four great ancient civilizations . In Marco Polo's travel book, it was described as a heaven where people live in peace and work in contentment. 2008 Olympic will be held in Beijing, which is the capital of China. Now the whole world are concerning about China. During this holiday, I visit Beijing from afar. I only have a camera with me. Beijing is magic. The Great Wall likes huge dragon across the horizon.
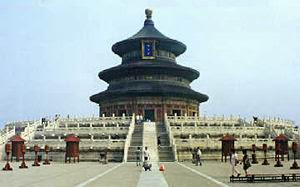
The palace museum is a grand place where the emperor live. It is the great quintessence of Chinese architecture.
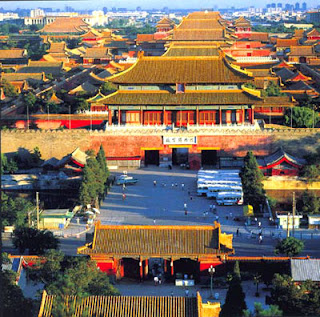
I live in a Chinese family during those days, I find them very friendly and kind. I eat Chinese food and dress in Chinese clothes.
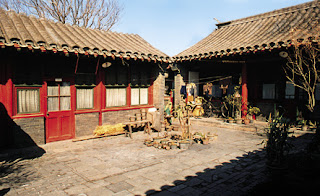
I have a wonderful time in China, I love China very much. I am looking forward to visiting China again in 2008, let us get together in Beijing Olympic.
When I leave China, It is too hard to say goodbye. After I go back home, I pick some memorable pictures and make a DVD slideshow, which record my whole travel in China.
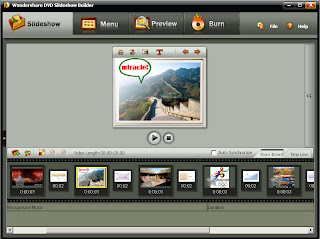
Now China is a very prosperous and advanced country. Every family has TV and computer with broad band. I send my DVD slideshow which can be played on TV to them as a gift. Although I can put my slideshow on my youTube and myspace, only a few my Chinese friends know it.
Statement: Some pictures above are not mine. I just copy them from somewhere.

Monday, August 27, 2007

Show off Your imagination on Your Apple iPod Slideshow

Show off Your imagination on Your Apple iPod Slideshow
With the advancement of technology, our life become more and more colorful. Especially many cute and powerful digital products have brought a lot of fun to our life. Apple iPod is probably one of the most popular digital device, do you want to show off your imagination on your apple iPod, especially when you expect to treasure up the precious moment and share your joy and fun with your friends or family? I am a digital product enthusiast and ever used a good tool called Wondershare iPod Slideshow, which is a powerful slideshow making tool but easy to use. If you are interested, check out the tutorial below.

Step1: Download iPod Slideshow from http://www.photo-to-dvd.com/iPod-slideshow.html
then install and run it.

Step2: Add your photos and videos quickly
Click button “Photo&Video” to activate the file browse window, select one or more media files in the pop-up window and then click button. All the photos or videos will be ready soon.
Step3: Edit your photos and videos easily
○ Edit photo
There are five edit functions to edit your artwork. You can crop your photos, add text, clipart and photo effect just click the right button.
○ Edit Video
Double click on a video file thumbnail, you can trim your video and add video effect. Further, you can record your voice and then edit it.
Step4: show off your artwork with magic effects
○ Transition Effect
Click Effect Thumbnail to activate effect configuration window.
In the effect configuration window, make further settings as follow.
○ Ken Burns Effect
Click the pentagram on the photo or video thumbnail to activate effect configuration window. Then effect configuration window will slide out from the right edge of the application.

Step5: surprise your output
○ Now you almost complete your artwork. Take a preview first.
○ Click tab “make” to open output setting window.
The bigger resolution value you choose, the higher video quality you will get, but the file size will be larger. CD (44.1 kHz) is a higher audio quality for sample rate and radio (22.05 kHz) is a normal audio quality. You can select "Save to iPod" to transfer the output mp4 file to your iPod directly.


Tuesday, August 21, 2007

Creative Wondershare Photo Collage Studio V3.0

I enjoy my life very much, so I often keep my wonderful moments by digital camera. But how can I make my memories colorful and share them conveniently with my distant families and friends?

Recently I find a good helping hand——Photo Collage Studio. It is an easy and creative software that designed for making stunning collages and scrapbooks, now upgraded to Ver3.0 based on the survey and users'request!

Photo Collage Studio let you easily and effectively to design miscellaneous scrapbooks, with 100+ professionally designed templates and collage layouts, together with more beautiful photo frames, cliparts, stamps, wordart or special effects. You can also fully present your inspiration by using magic doodle drawing tool to create your own cliparts. In addition to scrapbook building, Photo Collage Studio allows you to print the high-quality scrapbook, make personalized desktop wallpapers, even share with your families and friends via email.

Magic doodle drawing is my best favorite. This erasable sketchpad tool can let me have an unique experience by using pencil, brush, magic stick to create your own custom, colorful illustrations, which will fully show my creativity. Also add more colorful free resource, such as professional designed templates, layouts, cliparts, photo frames, wordarts, stamps, will give me more choose and satisfy more my needs. High quality prints and new added page layout setting ability will help me create beautiful prints on one page, or across several pages.

Fun and wonderful start now from
http://download.photo-collage-software.com/pcls_trial.exe
The official website is http://www.photo-collage-software.com/

This is my digital collage or scrapbook maded by Creative Wondershare Photo Collage Studio V3.0


Sunday, July 29, 2007

Baby Photo Slideshow & Photo Album

July 21, 2007

Exactly two years ago, on July 21, that was the day when Ted arrived, and from that day on, the three of us, Brian, Ted and I, was called a family. July 21 again, Happy Birthday, my dear!
Some days ago, getting an amazing copy of Photo Story Platinum from GAOTD, So wonderful, I started to make a baby photo story with the dazzling templates, add on clips and background music.

Some marvelous ideas came up to me:
  • Delivered the DVD photo album to Ted’s grandparents and they felt delighted to receive our baby photo album.
  • Made it as iPod movie, and showed off my baby’s photo album with friends!
  • Brian suggested sharing the baby album on YouTube, as well as a flash photo album for Myspace and blog, which were obviously great ideas!
  • Contacted ourpix.com, the webmaster of which saw my baby photo story and decided to put it on their website. Terrific! Thanks ourpix.com!
Ted, wish you would love this special birthday gift.
Best Regards,A happy mother, Priscilla


Wednesday, July 25, 2007

Wondershare iPhone Slideshow V1.0

June. 25th, 2007 – Wondershare Inc., the global award-winning provider of multimedia software for digital photographic & video and more, today released iPhone Slideshow, which is good news for iPhone fans.

Wondershare iPhone Slideshow is innovative facility to convert your digital photo and video to iPhone MP4 files. With powerful and flexible features, the program makes it easy to make your photo movie, along with emotive background music, playful clipart, and attractive transition effects conveniently! Just like a pro.

Top News in iPhone Slideshow Ver.1.0:

  • Support virtually almost all photo/video and audio formats;
  • Tons of transition and ken burns-styled effects bring your digital photo & video into life.
  • Use the built-in audio trimmer to crop songs and add fades;
  • Perfect good photos with editing tools including crop, rotate, clipart, text, frame, etc.
  • Easy video splitting. Choose the video segment you wanted before conversion.
  • At one click, get audio and video sync.
  • Its preview display in simulative iPhone screen enables you to make the creation enjoyable and vivid.
  • High quality MP4 video (iPhone video) in multiple output size;
  • High-speed encoder ensures smooth conversion of video and audio data;
  • Turn off your computer automatically to free you.
"We stick to provide software, which is not only for beginners to share their photo slideshows, but also for maestros to start a creative masterpiece." Said Sun, CIO of Wondershare Inc... "So we prefer to start the project with very clear steps for novices to follow. Besides, cool stuffs are added for creating a professional and unique photo slideshow." he continued,"In a word, we appreciate the support from all Wondershare users."

Pricing and Availability
iPhone Slideshow
is priced at $29.95 for Single-user personal license of the electronic versions. Multiple-user license are also available at special offer. It's certainly exciting news for all iPhone fans. To get more information and obtain a free trial version, please visit
http://www.photo-to-dvd.com/iphone-slideshow.html

Wednesday, July 18, 2007

Ourpix.com is released – Focus on Your Needs!

Bound to please, Wondershare Inc. released the brand-new website – http://www.ourpix.com.

Ourpix.com is especially designed for Wondershare Photo Story Platinum. With the clear navigation and vivid interface, we wish you will have more fun surfing on net and better experience with Photo Story Platinum.

The best season for traveling is finally upon us! Any good ideas for your digital photos on journey? Not yet? Check out the sample, you will find the inspiration!

What’s your opinion? Come on baby, let the fun begin!

Monday, July 16, 2007

15-Minute Reviews :: Wondershare Photo Story Platinum v2.1.0

http://www.bladedthoth.com/reviews/15mrs/wondershare-photo-story-platinum-v2-1-0/

Hello all and welcome to another 15-Minute Review! Today’s application is Wondershare Photo Story Platinum version 2.1.0 by WonderShare Software – An application to generate a digital album for your enjoyment.

Software Description
As Giveaway of the Day states:
“Not only an Album, not only Alluring. Photo Story Platinum gives you a new way to create photo albums from preset templates. These templates contain animations, effects & even transitions that are pre-arranged into interesting story. Simply add your photos, choose the templates, add some decorations, intro/end cast movie. Then share your story on Web, iPod/iPhone video, even author your own DVD.”

Quick Pros
Interface very easy to use – Professional look
Crop, rotate and filter each image individually
Selection of image movement templates, intro and end frames, decoration and more
Large selection of output options including FTP upload, screensaver, DVD burning and more
Resulting files are very good quality

Quick Cons
No music file preview functionality EDIT: It does have preview
Website output files should be simplified in name
SWF files should have had a preload animation/screen as glorious as the intro pages
Small glitches with the SWF files on two occasions
Delete button too easy to click on in main menu’s projects

Expansion
With so many people taking more photos than ever thanks to the advent of the digital camera and its ‘reusable film’ (Memory cards), people are looking for a way to present their photographs; Scrapbooks, albums, videos and more. This application fits into a few categories and provides another way to present your photographs to friends, family and the world.
The first part of this application that struck me was the professional-looking layout. It is as if the application has had years and money to throw at refining the interface. While there are a few awkward factors about the interface here and there, overall it is very smooth and easy to use.
There is a ton of features in this application – When I used this application, I found that I didn’t have to duck in and out to do chores related to the application; Granted I may still go into a photo-editing application for more advanced control of the original photos. There is control available over each individual image rather than just batch settings; Crop, rotate and a decent collection of filters can make the slide sing that much more. The more important filters are brightness, contrast and hue/saturation. The hue/saturation filter is odd for usage, but can help touch up the sky colors in your images.
There is also a large selection of image templates – IE: how they move on/off screen. There are even templates that more than one photo is used by the grouping; A good way to display a set of similar images. There is also a small selection of video intro and ending screens as well to introduce your slideshow and end it as well. With this, there are more templates available online at The author’s website.

I was surprised at the output selections. Not only can you create an SWF file for online use, you can also have it generate the HTML, or even have it upload it to an FTP site or online album site as well; there is even the ability to email it as well. You can also create an EXE file or turn it into a screensaver as well. You can also convert the file into a wide range of video formats, including presets for portable units and many more. The last one is DVD authoring and burning. With this, the application allows you to put in multiple albums you’ve created into the workplace and create a DVD, menu and all. There is even burning software built-in, so you again don’t have to step outside the application.
While the application does a lot and runs well, there is a few quirks I must touch on. First of all, there is no music file preview functionality; You’re left having to remember what songs are, and if you have a sizable collection, this may be a challenge to find the right file for your needs. EDIT: There is music file previewing available when you use the Music Setting button
As well, when the application creates the SWF and HTML files, it should simplify the names for web usage; spaces into underscores, and lowercase the name as well is what I would have done for easier handling online. Speaking on SWF files, while there is supposed to be a preloader screen, all I got was a black screen until the play button came up. I played around a bit but unfortunately could not find a fix for this and I am unsure why. I did have a glitch once where they play button didn’t want to come up when I had it on and another time that it got stuck looping the intro page.
One last note I must mention; Although the delete album function does ask you to confirm deletion of your file after you click delete, I found the delete and open buttons were a little too close to each other based on size and such and could see accidental deletion occuring still with the confirmation box.

Final Verdict
While there are little issues and that there could be more templates (The author is trying to build on the latter by offering a download page for more), this application is a really cool tool and it has ended up in my personal collection of applications. While free, I would definitely recommend picking it up; It is worth it to immortalize your images in a new form and bring life to your images. As for paying $49.95, this application is worth that much, so long as you plan on using it more than once or twice, and even then may still be worth it to many. That said, the author is offering people who download this application free from Giveaway of the Day a deal for now or down the road and available easily inside the application. You can purchase any future versions (which also offers full support) for $24.95, essentially half-price, which may well be worth it for any major improvements to the application which may come to be.

Posted by BladedThoth on Monday, July 16, 2007

Wednesday, July 11, 2007

How to add video captions to your slideshow

A photo slideshow, in addition to such basic video editing, like ken burns-style effects, transition effects, background music, believe it or not, will be greatly polished by adding some captions. Whenever possible, captions should coincide with the on-screen activity and sentiment. Most software can make it using transcript. Don't worry about that! Preferably, you can find an all-in-one tool such as Wondershare DVD Slideshow Builder, to caption your video fast and easily at your fingertips.

How It Works
In DVD slideshow Builder, first of all, you need to select the photo/video clip you want to caption in storyboard. In view box above, click 'Text' icon to open 'Caption Edit' panel.

Specified steps should be followed:
  • Point: Click the 'Play' button to playback the video from the beginning.
    Press 'Pause' when you find it the optimal start point to let captions to appear.
  • Text: Now, it's time to add the caption on this screen. Click '+' to active the text column and type the text content. On the contrary, click '-' to delete the text.
  • Effect: Drag the text box on the screen to adjust the position. Moreover, set the font family, size, color and action effects to enhance your slideshow.
  • Don’t forget to confirm it by clicking 'Set'.
  • Preview: Go back to the preview to check if your caption is Ok as you wish.

Note: If the starting point exceeds the length of the photo duration time, the caption won't display on the photo.

Friday, July 06, 2007

Flash Slideshow Business Solution


As a sales manager, Mike need to prepare business presentations for new products frequently.

Mike has been exhausted in preparing a persuasive presentation until he find Flash Slideshow Builder.

Wonderful!! With Flash Slideshow Builder, it can't be any easier to create professional-looking business flash presentations. Mike successfully achieves to:
  • Introduce products explicitly with vivid photos and text captions.
  • Archive the product photos in slideshow way - an orderly way.
  • Add voice narrations, such as experts’ comments and users’ compliment.
  • Make each page of the slideshow flash clickable and link to the corresponding product web page.
  • Post the introductory slideshow to product website and make the dull site more interesting.

Now, Mike feels that preparing for a business presentation is as easy as turn his hand over.

Monday, June 25, 2007

Tell Your Photo Story on Youtube

Introduction
A good season for traveling is coming! Do you get digital photos ready? If yes, why not tell your photo story on Youtube? Well, let's begin to make our Youtube photo album and share with the world!

Things you will need


  • Your digital photos;
  • Digital photo album maker (Wondershare Photo Story Platinum is recommended);
  • Youtube ID (Free to register);
  • Music (Optional, but better to prepare).


Ready? Go!

Step 1, Download Photo Story Platinum and install.
http://download.flash-slide-show.com/psp_trial.exe


Step 2, Start the program.
Run Photo Story Platinum and create your own album, then import your digital photos and background music.
photo album maker-add photo


Step 3, Apply animated themed templates.
Double click to apply any themed templates, or click "Auto-set" to fix the album. Real-time preview is available when a template is selected.
photo album maker- template

Download more templates and other resources from,
http://www.flash-slide-show.com/free-dvd-menu.html


Step 4, Choose intro & end movie.
There are different excellent animations to choose from, just preview and pick your favorite. Input the album information, such as title, director, cast, etc. and set the text effects like movie style.
photo album maker-intro & end movie


Step 5, Add your decoration.
Don’t forget to add your funny text caption with different text effects and stunning scene effects and clipart with flexible timeline.
photo album maker-decoration


Step 6, Publish.
Swap to "Publish" tab and click "Create Video" For a Youtube video, you need to choose "Youtube video (*flv format)" from the drop-down menu and start to convert.
photo album maker-youtube video


Step 7, Upload video
Login your Youtube ID, choose "My Account" and click "Upload New Video" button. Write down your video title and description. It’s better to enter tag for easily searched by others.
http://www.youtube.com/my_account


Step 8, Finish!
Now your Youtube video is ready! So, don't forget to share it with others. Would you like to see mine?