If you don’t want to add music between photos, you can choose to add music for one slideshow, which is played as the slideshow background music.
1.On the Music page, to add music which you like from your computer. When the photo slideshow include a variety of photos, add some music, and move the up or down arrowhead for the play sequence.
2.If you like to adjust the way to play the music, choose fade in or fade out. The effect will be displayed with the photo slideshow in sync.
After completed your setting, if you need to get a .mpg file for the photo slideshow, click Export Movie and it will take your several minutes to create movie file. So you will share your slideshow on the compute or other player before burned them.
Related Tutorials:
XML Slideshow
Free Flash Banner Tutorial
Html Photo Gallery
Flash Image Scroller
Flash Slideshow Tutorial
Flash 3D Carousel
Flash Image Gallery
Flash Image Rotator
Friday, April 28, 2006
Wednesday, April 26, 2006
How to add music or narration record to your pictures(3)
1. If you want, you can add music or narration to your pictures. Select a picture and click Set in the Music box. Click Import Music and choose one on your computer.
2. If you want to add a narration record, select Record Music and save the .wav file on your computer. First, make sure a microphone is connected to your computer, and then click Record button and begin speaking into your mic. You can Pause anytime and Stop when you finish.
3. After you are finished with your music and narration, you can edit it. The music information is display in the edit box. You can make a clip of the music or narration through setting a Begin Time and an End Time. You can also trim the volume and make a Fade in and Fade out effect to your music or narration. When you finish the editing, click OK to exit the editing box.
4. Add the music or narration to other pictures repeat steps 1 through 3 until you have selected all the music that you want to add to your pictures.
Create unique slideshow with funny words
Create slideshows easily and quickly just with some funny words
I downloaded several photos of some cuties. All of a sudden, I got an idea to make a flash slideshow and add some funny words. I’ve post that Slideshow on Google groups, and someone gave me a five-star rating. Follow my steps, and you can make a special one as well.
Step 1 Add photos to story line. I suggest optimizing them beforehand – it’ll look better if all the photos are in the same size in my opinion. This software supply basic editing, such as brightness, contrast, blur, sharpen, etc.
Step 2 Transition effect. There are too many transition effects for choosing, hence, I prefer the randomizing ability, and make a little change of one or two photos. It saves a lot of time.
Step 3 Add themes. Generally speaking, themes are suitable for different situation. Some of the themes are quite interesting for making a wedding slideshow or baby slideshow. If just wanting to embed the SWF file in your html page, however, you can choose No theme. Yep, there’s a creative way - that is to custom you own theme with clipart, text and photo frames.
Step 4 Write down your funny words. Begin with Edit >> Text settings.
Photo description. Input the specific illustration to your photos. All the words are added still.
Text list for spicing up your work. Click to in put any interesting captions. Then select your favorite animated effect, font and color to make the slideshow dramatic. The text effects include Fade, Fade and Zoom, Typewriter, Random, Explode, Target, Piano, Flying, Wink, Random color. The text can be dragged to any place you want. After this done, click
  to continue adding for next slide.
Step 5 Save your masterpiece as SWF, HTML, EXE, Screen saver or online album.
Tips:
If what you want to write is too long, just make it in several rows, with same or different font, text effect and color as you like.
Warning:
The slideshow made with no theme will be published in 4:3. Max size is 1600*1200.
Related Tutorials:
XML Slideshow
Free Flash Banner Tutorial
Html Photo Gallery
Flash Image Scroller
Flash Slideshow Tutorial
Flash 3D Carousel
Flash Image Gallery
Flash Image Rotator
I downloaded several photos of some cuties. All of a sudden, I got an idea to make a flash slideshow and add some funny words. I’ve post that Slideshow on Google groups, and someone gave me a five-star rating. Follow my steps, and you can make a special one as well.
Step 1 Add photos to story line. I suggest optimizing them beforehand – it’ll look better if all the photos are in the same size in my opinion. This software supply basic editing, such as brightness, contrast, blur, sharpen, etc.
Step 2 Transition effect. There are too many transition effects for choosing, hence, I prefer the randomizing ability, and make a little change of one or two photos. It saves a lot of time.
Step 3 Add themes. Generally speaking, themes are suitable for different situation. Some of the themes are quite interesting for making a wedding slideshow or baby slideshow. If just wanting to embed the SWF file in your html page, however, you can choose No theme. Yep, there’s a creative way - that is to custom you own theme with clipart, text and photo frames.
Step 4 Write down your funny words. Begin with Edit >> Text settings.
Photo description. Input the specific illustration to your photos. All the words are added still.
Text list for spicing up your work. Click
to in put any interesting captions. Then select your favorite animated effect, font and color to make the slideshow dramatic. The text effects include Fade, Fade and Zoom, Typewriter, Random, Explode, Target, Piano, Flying, Wink, Random color. The text can be dragged to any place you want. After this done, click to continue adding for next slide. Step 5 Save your masterpiece as SWF, HTML, EXE, Screen saver or online album.
Tips:
If what you want to write is too long, just make it in several rows, with same or different font, text effect and color as you like.
Warning:
The slideshow made with no theme will be published in 4:3. Max size is 1600*1200.
Related Tutorials:
XML Slideshow
Free Flash Banner Tutorial
Html Photo Gallery
Flash Image Scroller
Flash Slideshow Tutorial
Flash 3D Carousel
Flash Image Gallery
Flash Image Rotator
Tuesday, April 18, 2006
Mandy & Sandy (2)
Still remember those two naughty girls? Yep, I've made another Slideshow of them. How do you think about that? Am I making a little progress? :)
Maybe it would be better to add some music, but I didn't get the suitable one.
In fact, I want to get the latest photos of Mandy and Sandy, yet, just one or two photos can be found. So, please wait a little longer! Enjoy!
codebase="http://download.macromedia.com/pub/shockwave/cabs/flash/swflash.cab#version=6,0,65,0" id="plmm" width="600" height="450">
quality="high" bgcolor="#FFFFFF" swLiveConnect="true"
width="600" height="450" type="application/x-shockwave-flash"
pluginspage="http://www.macromedia.com/go/getflashplayer">
To add motion and transition effects(2)
1.If you want to add motion and transition effects, do the following:
To add picture motion effect, click Zoom&Pan selecting box. You can choose Random Selecting, None, Panning, Zoom In, Zoom Out and Panning advance.
To change the picture transition effects, select the effects you are interested in. These effects have been sorted by four kinds, smooth effect, slide effect, fade effect and other effect.
2.After add effects to pictures, you can set the duration of the effect and transition effect. Change the number in the Storyboard, the number below the picture is effect duration and the number between the pictures is transition effect duration.
3.When you finish setting, click play to view your effects.
Friday, April 14, 2006
Make your dvd slideshow with DVD Slideshow Builder (1)
After you have installed DVD Slideshow Builder, you are ready to start creating your photo and video slideshow. When you are satisfied with your creation, save it to DVD.
To import pictures
1.To start DVD Slideshow Builder for Windows.
2.In DVD Slideshow Builder, on the Organize page, click +New, and then click New photo slideshow.
3.On the Select photos to add to your slideshow page, click the folder in which the pictures you copied from your digital camera are located. Select one or more pictures, and then click add or add all, then click Close.
To arrange and edit your pictures
1. If you want to rearrange your pictures, you can also click and drag pictures to a different location.
2. If you want to view pictures with big or small thumbnail, click the button Change slideshow view style at the right side of the tool bar. You can view pictures in 150*112, 120*90, 80*60 and 40*30.
3. If you want to rotate pictures, click Rotate90 to the selected pictures. You can choose rotate 90 degrees clockwise or anticlockwise.
4. If you want to make additional changes, such as correcting contrast or adding an effect to your picture, click the Edit button or double click the selected picture, and then do one of the following in the Edit Pictures dialog box:
To rotate the picture, click Rotate 90 , Rotate 270 or Flip.
To set Basic editing, change Contrast, Brightness, Blur or Mosaic.
To add an effect that changes the appearance of your picture, such as Negative, Gray or Black and White, click the Photo Filter tab, and then select an effect in the Effect list.
When you are done editing your pictures, click Save&Close to save the changes made to your pictures. To continue, click Previous or next.
Click here to download DVD Slideshow Builder
Christmas photo presents
How to make homemade video
Wednesday, April 12, 2006
Photo slideshow of two lovely girls
Couples of days ago, I found some lovely photos of two girls when visiting a forum. They are twins from China, named Mandy and Sandy. So cute they are, therefore, I decide to share them.
For there are two many photos, then I think make a photo slideshow is needed. The funny words were added by myself. And this is the first photo album, something new will come soon.
By the way, Mandy and Sandy were two years old in the photo, they are now four! I am waiting for their latest photos!
For there are two many photos, then I think make a photo slideshow is needed. The funny words were added by myself. And this is the first photo album, something new will come soon.
By the way, Mandy and Sandy were two years old in the photo, they are now four! I am waiting for their latest photos!
Create your beautiful menu template for your DVD slideshow
Tool: DVD Slideshow Builder
Add your photos as a slideshow. Edit your photos, add music or narration record and add other special transition effect to your photo slideshows. Then come to our theme about producing stunning menu template.
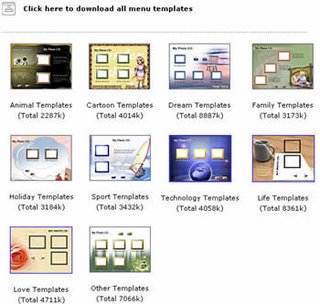
First, choose your favorite picture as the menu template. You can select from the ones attached in the software. There are many sorts can be chosen.
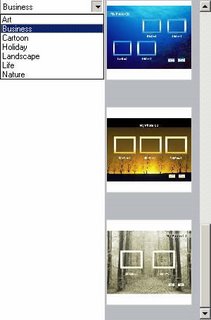
If you don’t like the template it including, you can download more templates in the website. More templates are offered to you.
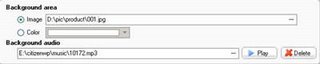
However, if you still don’t think they satisfy your require, it also allows you to make your own wonderful template. Choose the beautiful picture from your local driver as your background area. Then, you can begin to edit your template. Frame, button, and background music, all of these can be added and edited.
Change the button and frame with attached ones in the software or download from website.

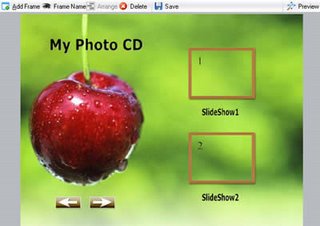
Text can also be added on to the menu template to make your menu content more abundant. You can set the Font, Shadow and Halation. Static clips are also supported. Use the offered or custom yourself to make your wonderful DVD Menu.

The following is the one that I produced.Hope you can make out better DVD Menu.
Add your photos as a slideshow. Edit your photos, add music or narration record and add other special transition effect to your photo slideshows. Then come to our theme about producing stunning menu template.
First, choose your favorite picture as the menu template. You can select from the ones attached in the software. There are many sorts can be chosen.

If you don’t like the template it including, you can download more templates in the website. More templates are offered to you.

However, if you still don’t think they satisfy your require, it also allows you to make your own wonderful template. Choose the beautiful picture from your local driver as your background area. Then, you can begin to edit your template. Frame, button, and background music, all of these can be added and edited.

Change the button and frame with attached ones in the software or download from website.


Text can also be added on to the menu template to make your menu content more abundant. You can set the Font, Shadow and Halation. Static clips are also supported. Use the offered or custom yourself to make your wonderful DVD Menu.

The following is the one that I produced.Hope you can make out better DVD Menu.

Thursday, April 06, 2006
A photo slideshow from Disneyland
Okay, I'm back. One part of our vacation included a weekend visit to Disneyland. Here's a peek through some of the Disneyland hotel. I have put them into a flash slideshow, enjoy.
The text at the bottom of the shop window is a quote from Walt Disney. "Disneyland will never be completed. It will continue to grow as long as there is imagination left in the world."
The text at the bottom of the shop window is a quote from Walt Disney. "Disneyland will never be completed. It will continue to grow as long as there is imagination left in the world."
Tuesday, April 04, 2006
Dog with wings

I had seen a topic on a forum about adding wings to a dog. I followed the steps and made a picture. You can also do it like this.
First, open the files of a bird and a dog. Lay the bird layer above the dog layer. Second, get the wings with the extract tool. Reduce the opacity until you see the dog. Erase the contour of the wing layer around the dog.
Third, increase the opacity of the layer to 100%. Then, you can get the picture. If you want to add the shadow, use the transform tool to place the shadow on the ground and tune it until it seems relatively good.
It is very easy.
The lovely dog.
Subscribe to:
Posts (Atom)